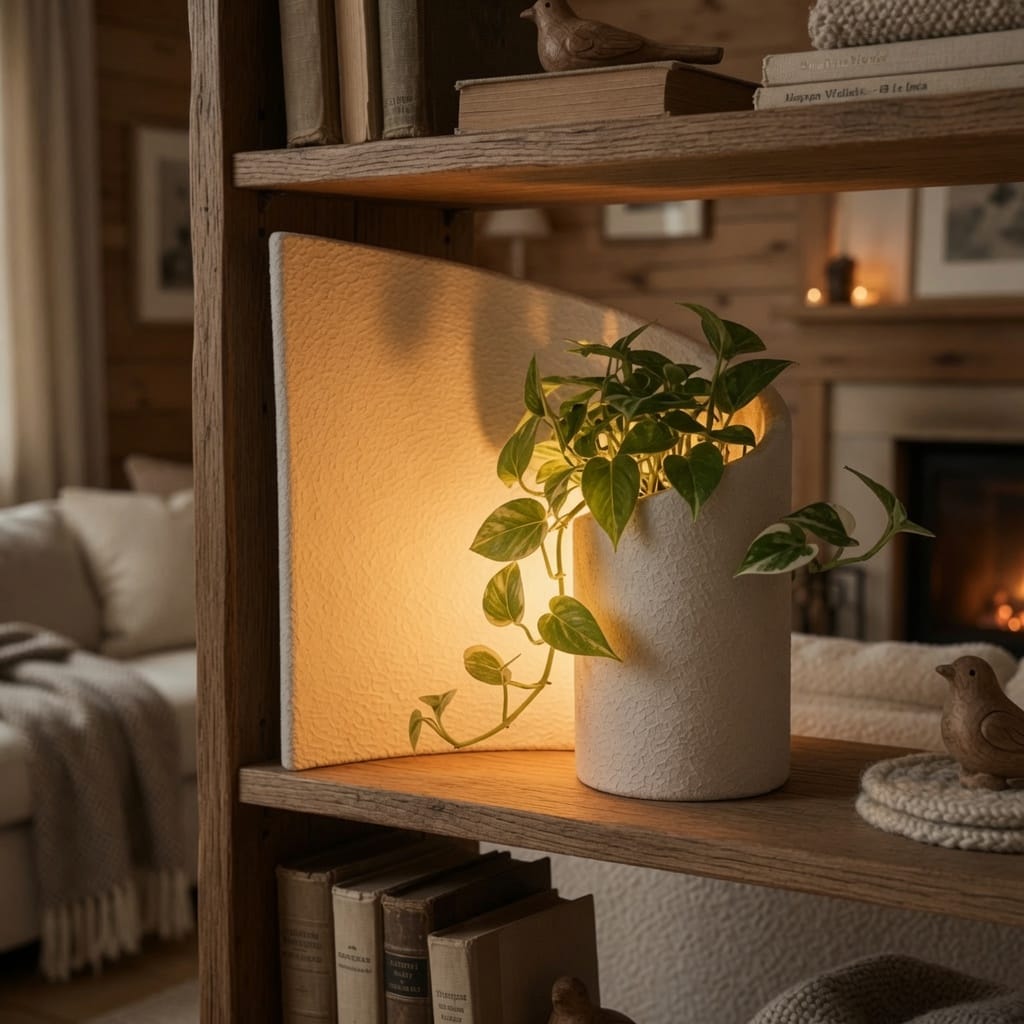
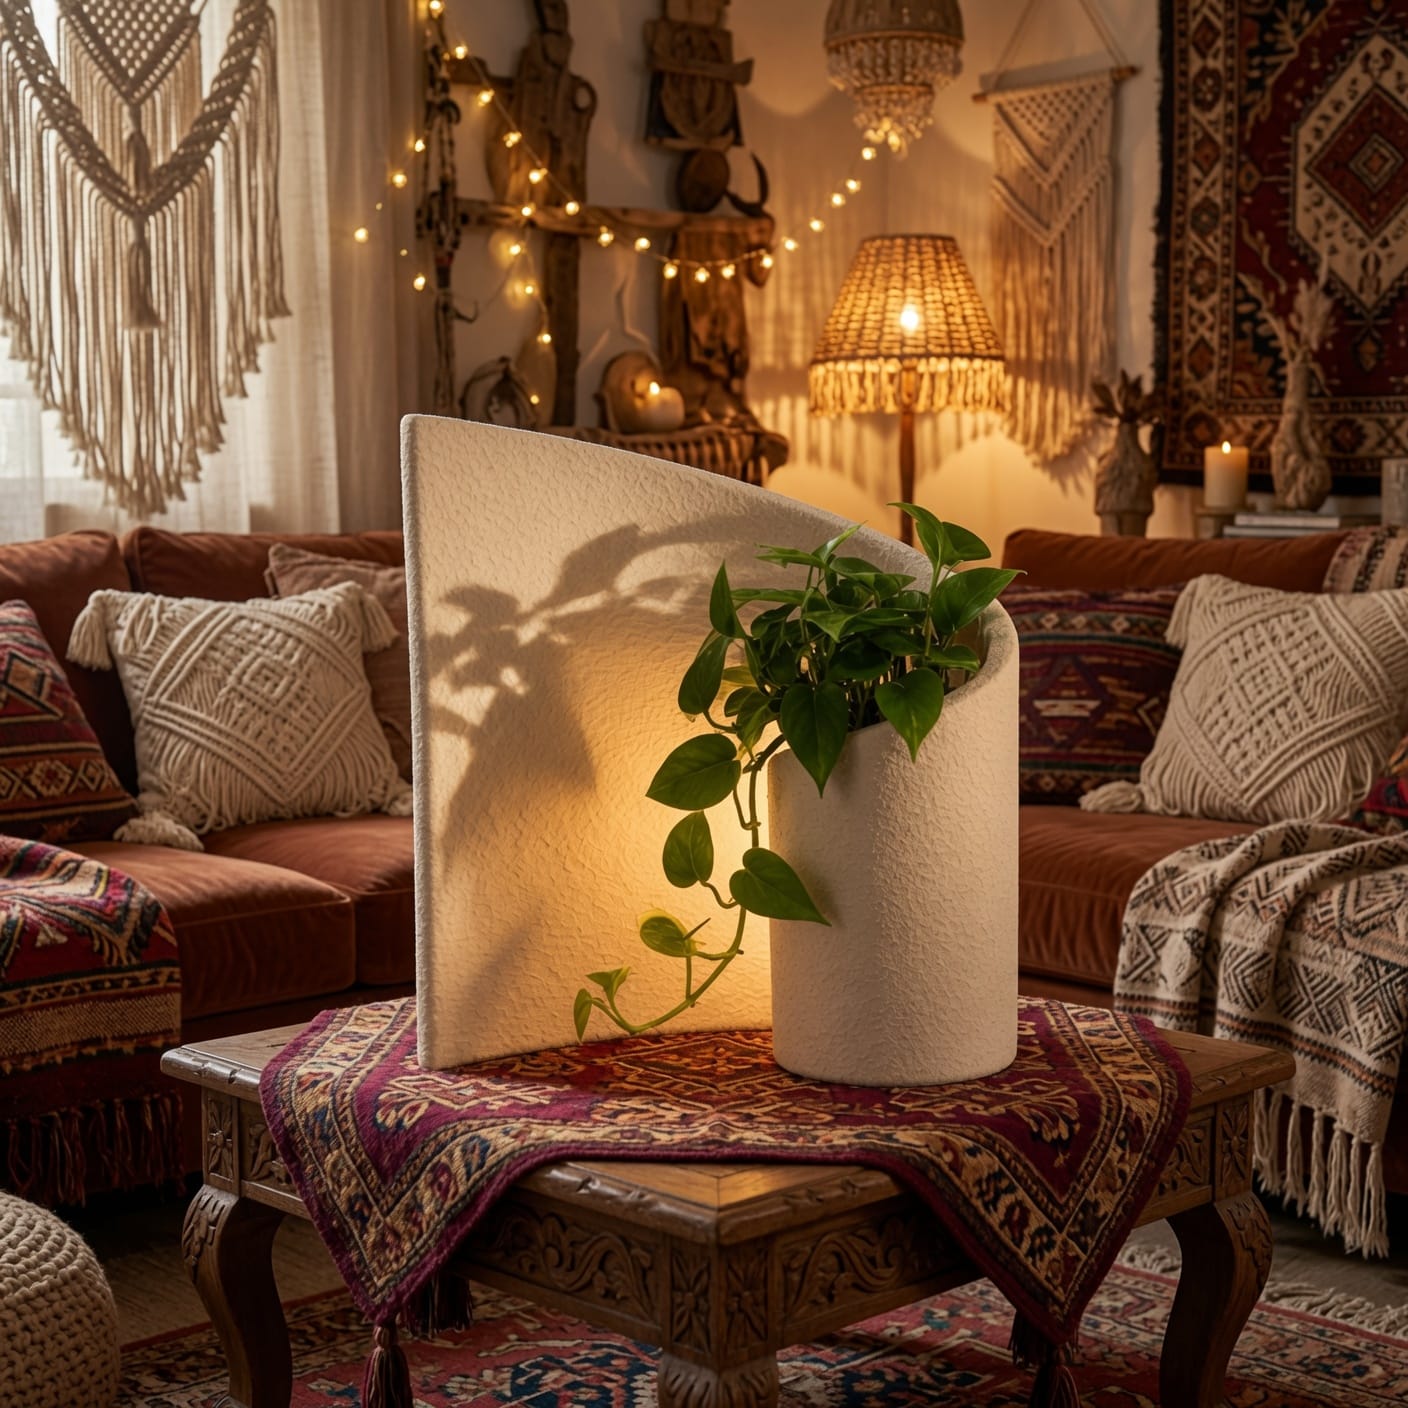
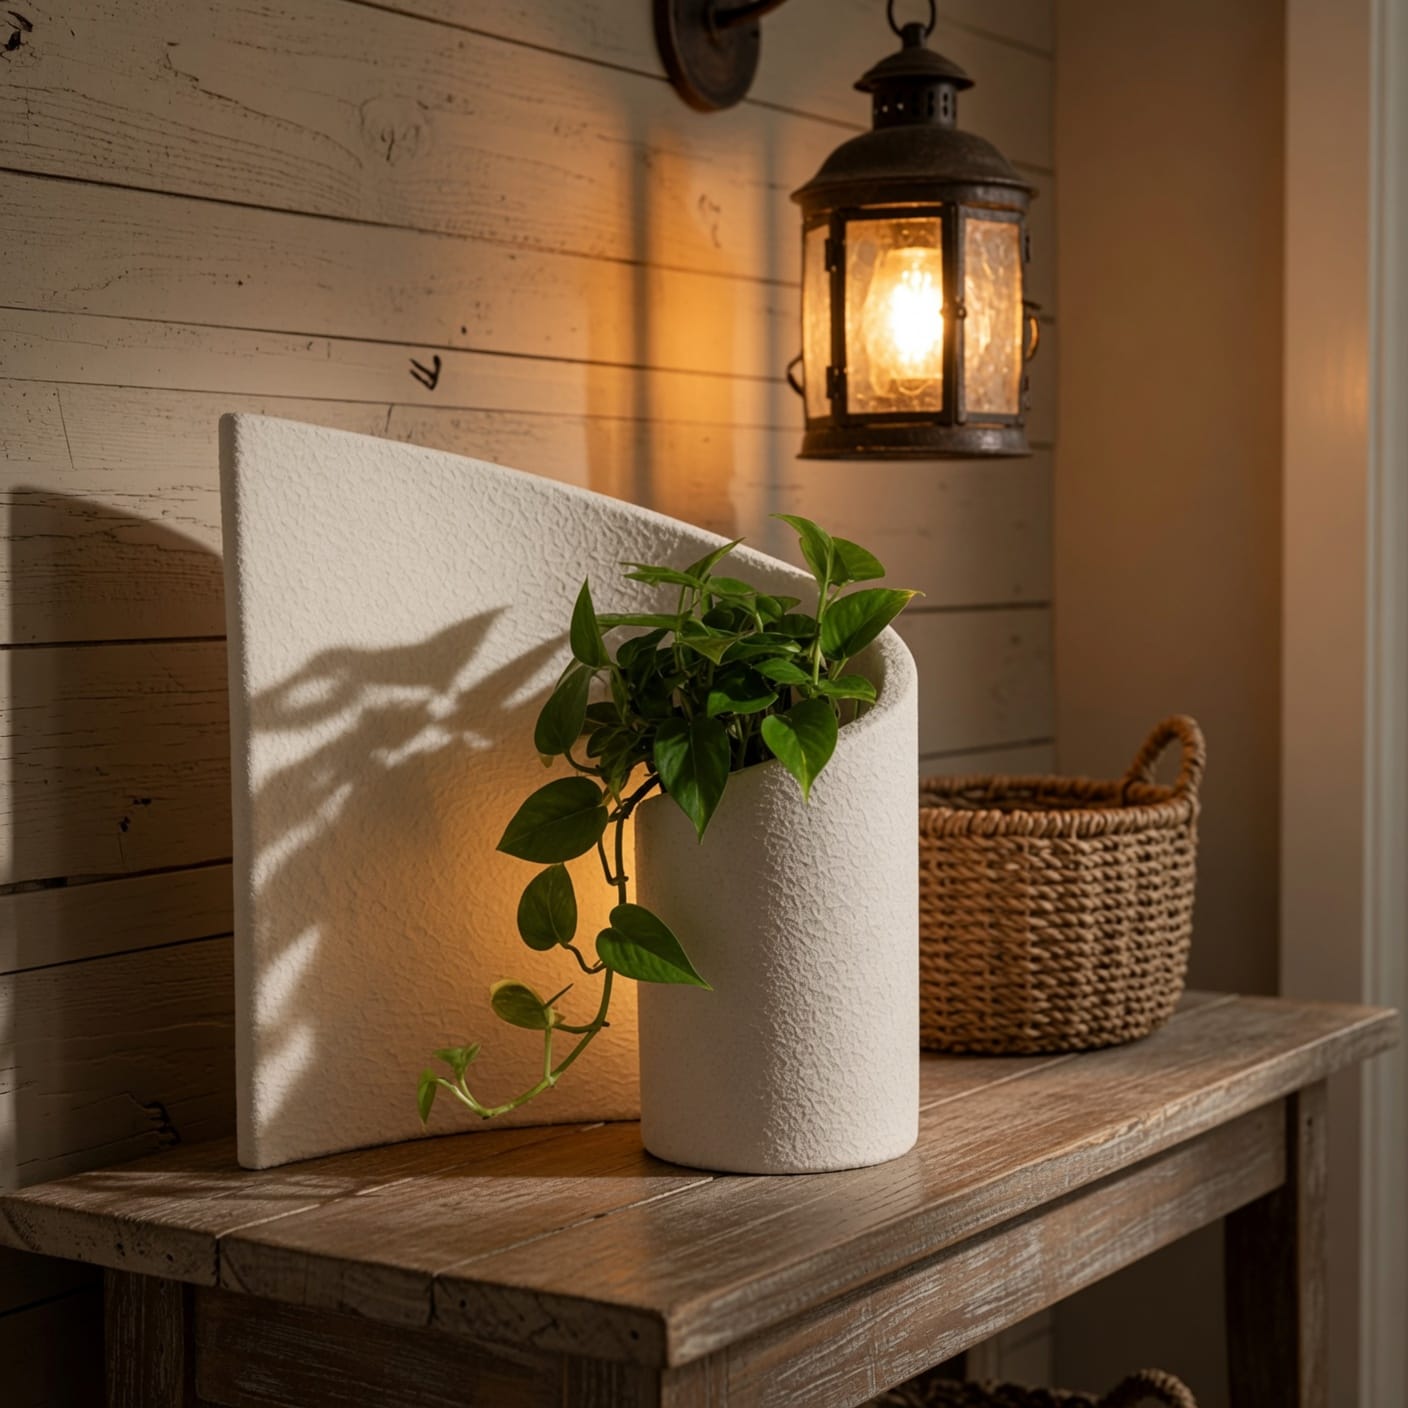
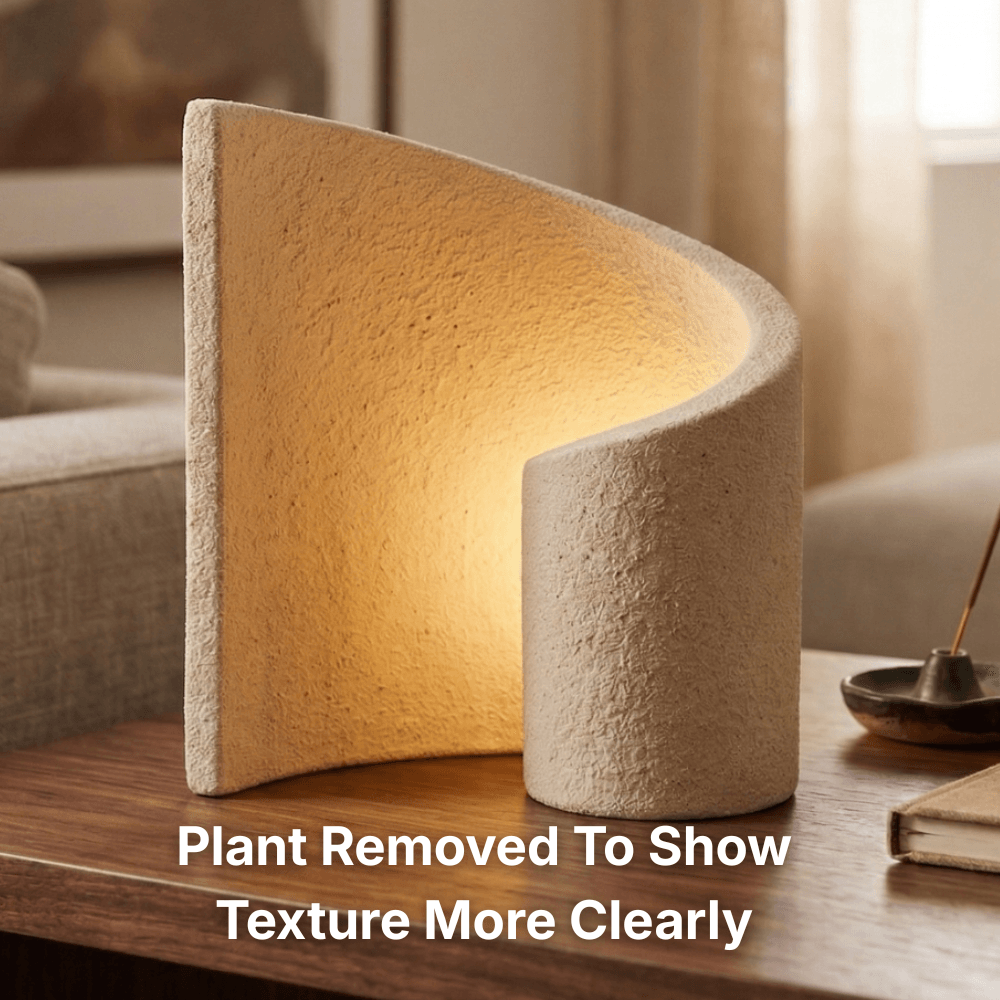
Make a Stunning Sculptural Planter That Glows From Within
...with a step-by-step video workshop designed for beginners.
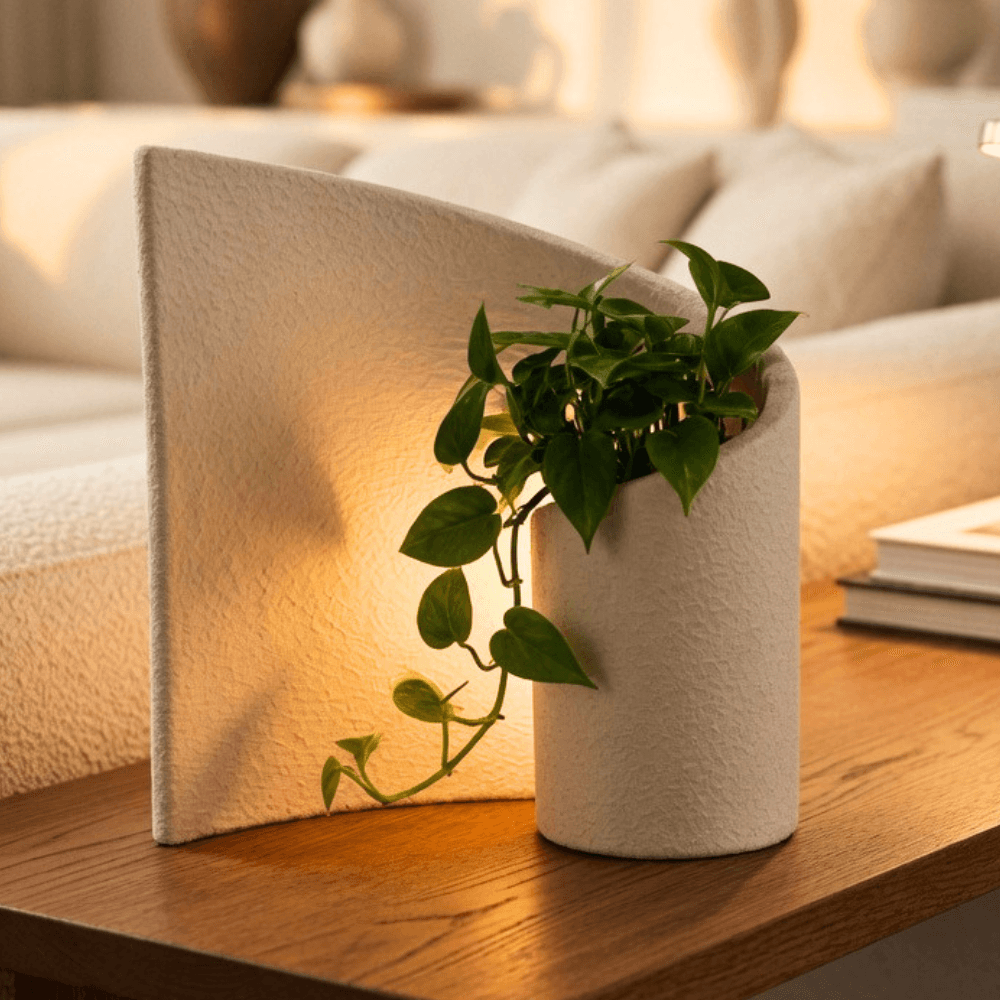
In just a few hours, you'll go from four basic materials to an illuminated sculptural planter that transforms the feel of your home.
Imagine if you could...
Shape something with your own hands to give a warm plant-filled glow to your home.
Create something genuinely new for your home. The kind of piece guests notice and ask about.
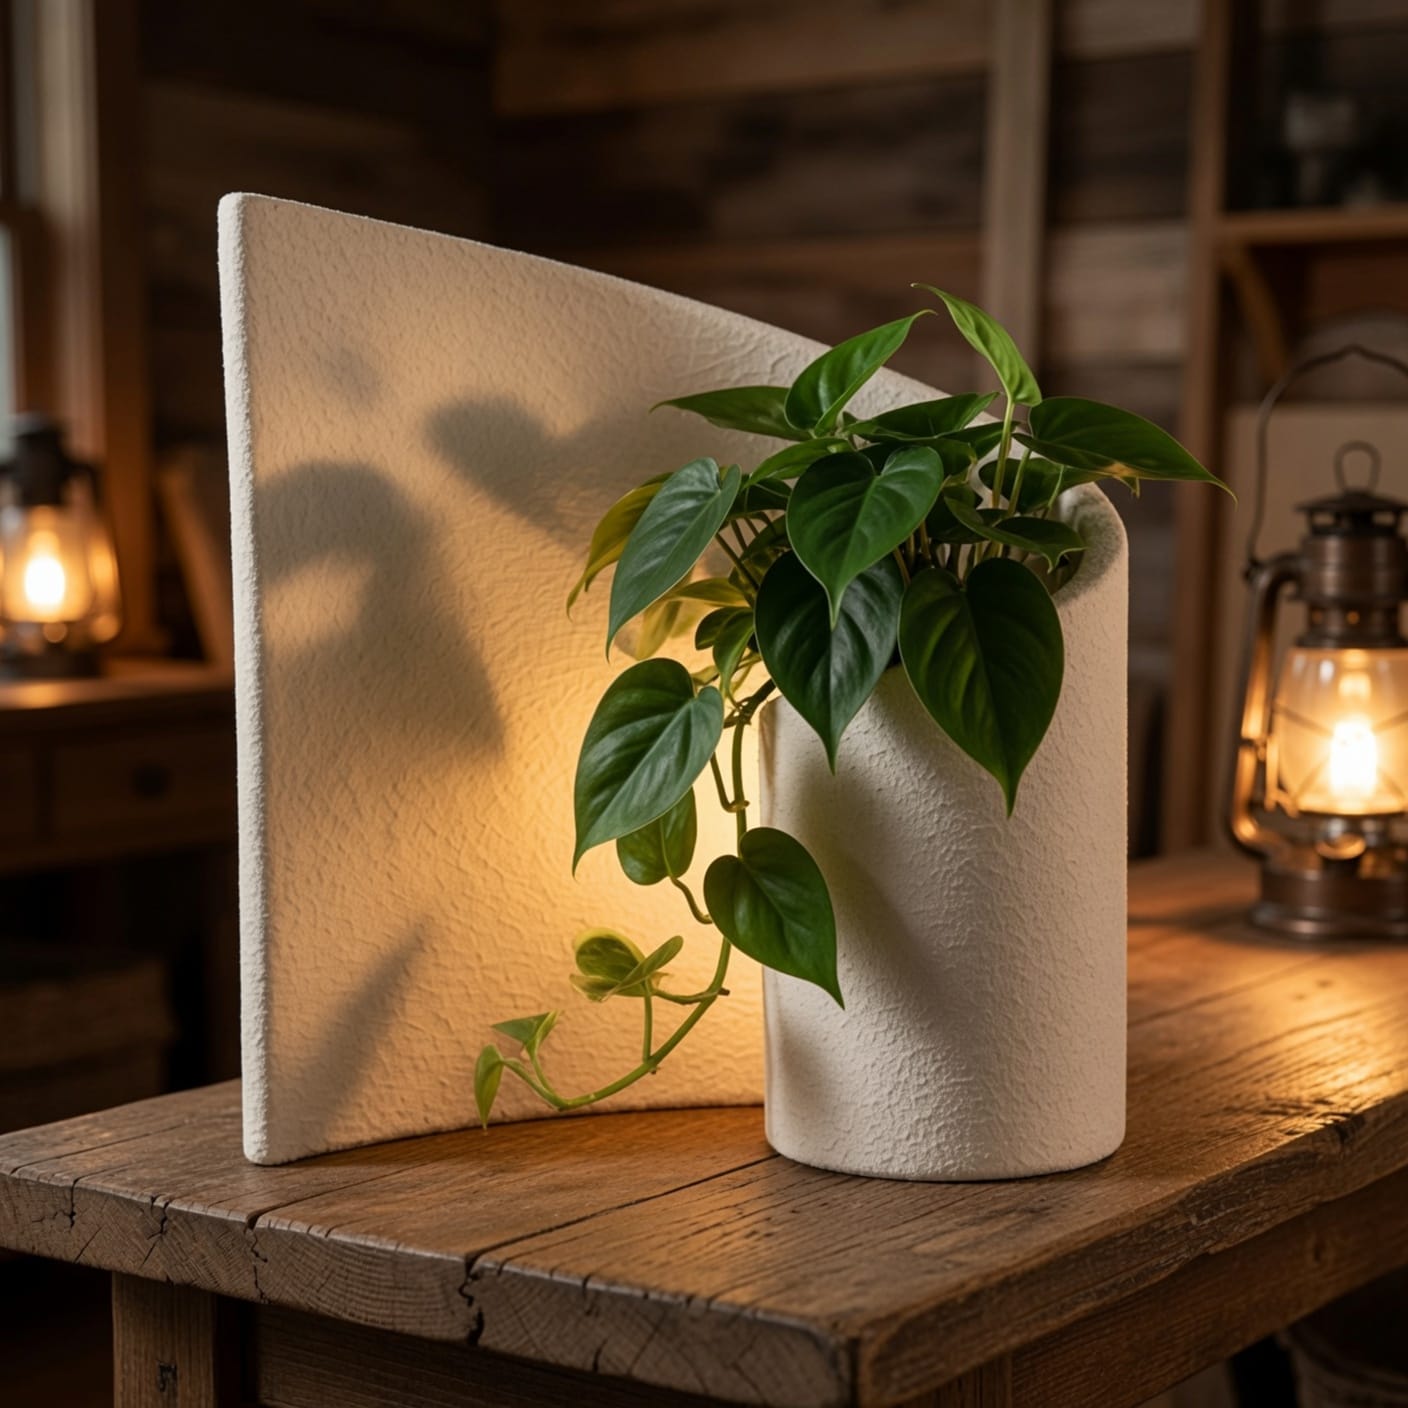
Turn down the lights on a quiet evening, turn on your planter, and watch your plant transform — leaves casting soft shadows.
Learn how to make natural, sculptural art that fits beautifully into your home — and feel proud to say “I made that.”

Imagine walking into your room and seeing this glowing on an end table — knowing you made it yourself.
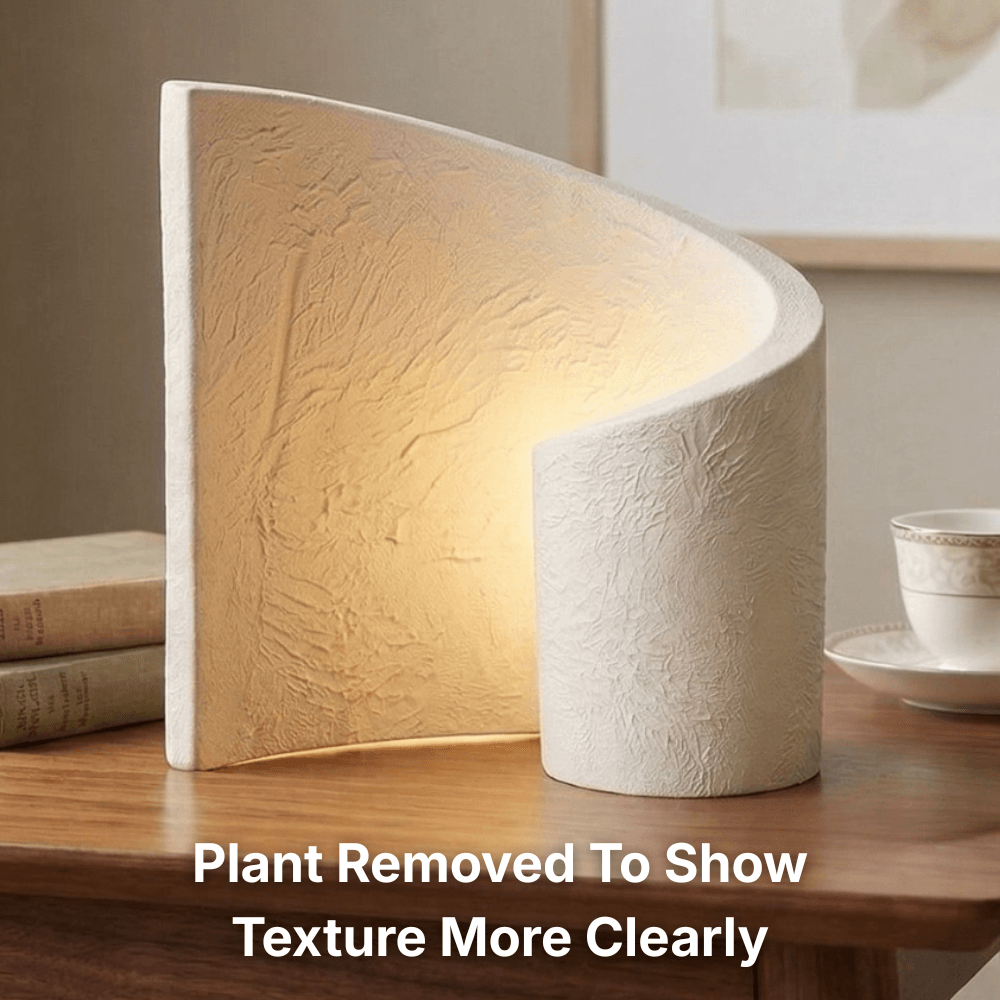
Minimal and matte, or rich with texture — every planter is one of a kind, because you shaped it by hand.
Sounds amazing, right?
But most plant lovers have never even come across something like this. And those who have assume it would be way too difficult to make themselves.
I used to be one of them.
At first, I was convinced something like this would be way too complicated. Surely you'd need years of experience, a workshop full of tools, or some kind of artistic background, right?
Nope. Turns out it's far more doable — and fun — than I ever imagined.
You don't need expensive materials or any prior experience to start.
But it wasn't all smooth sailing...
I had no idea how to even begin…
When I first searched for tutorials on creating tall, thin shapes like this, even the simplest ones, to create a sculptural planter, I expected to find straightforward, step-by-step guidance.
Instead, what I found was confusing and frustrating.
With no guidance at all, I was forced to make numerous mistakes when starting.
And I sadly wasn’t alone…
Here’s what most people face when they try this the first time…
Plus, LOTS of questions:
What is this even made from? There are dozens of options and it's difficult to figure out the right one.
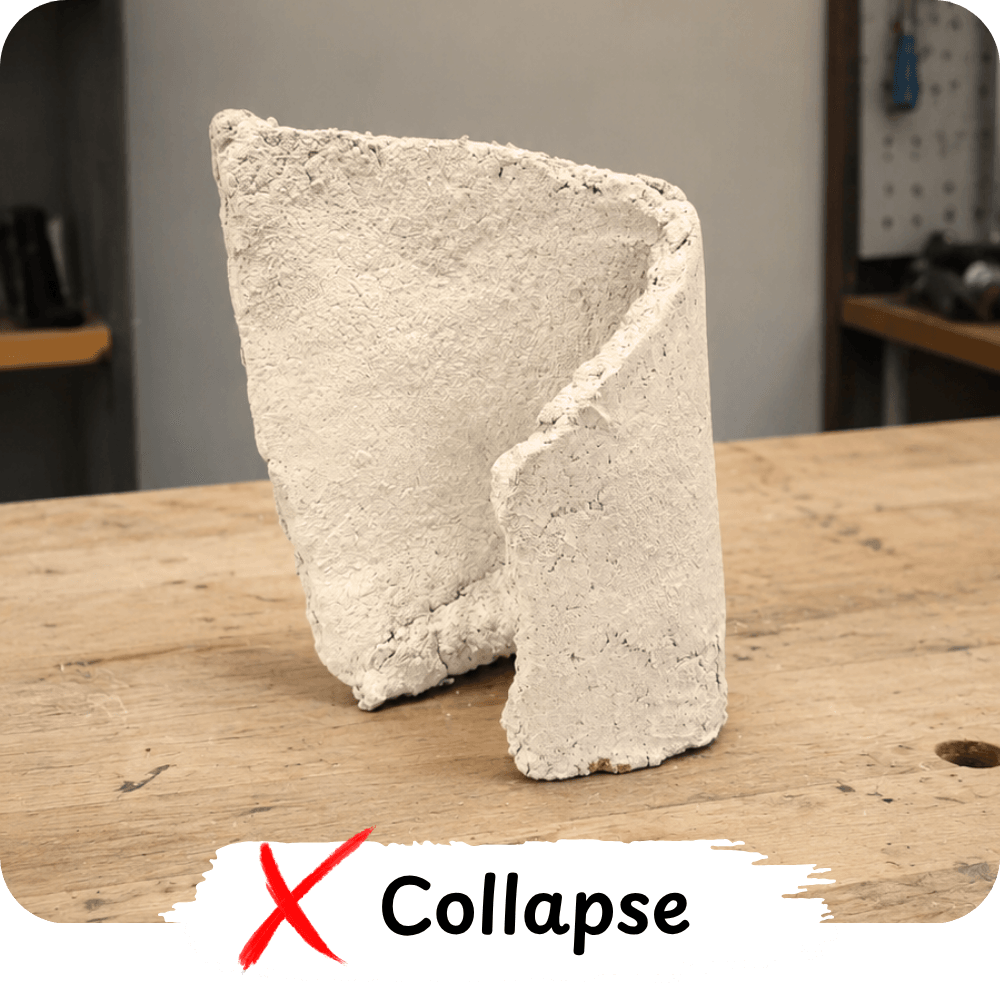
How do I get the shape to hold? You have no idea what's actually holding the form together underneath, or whether yours would just... collapse. (Like my first attempts did!)
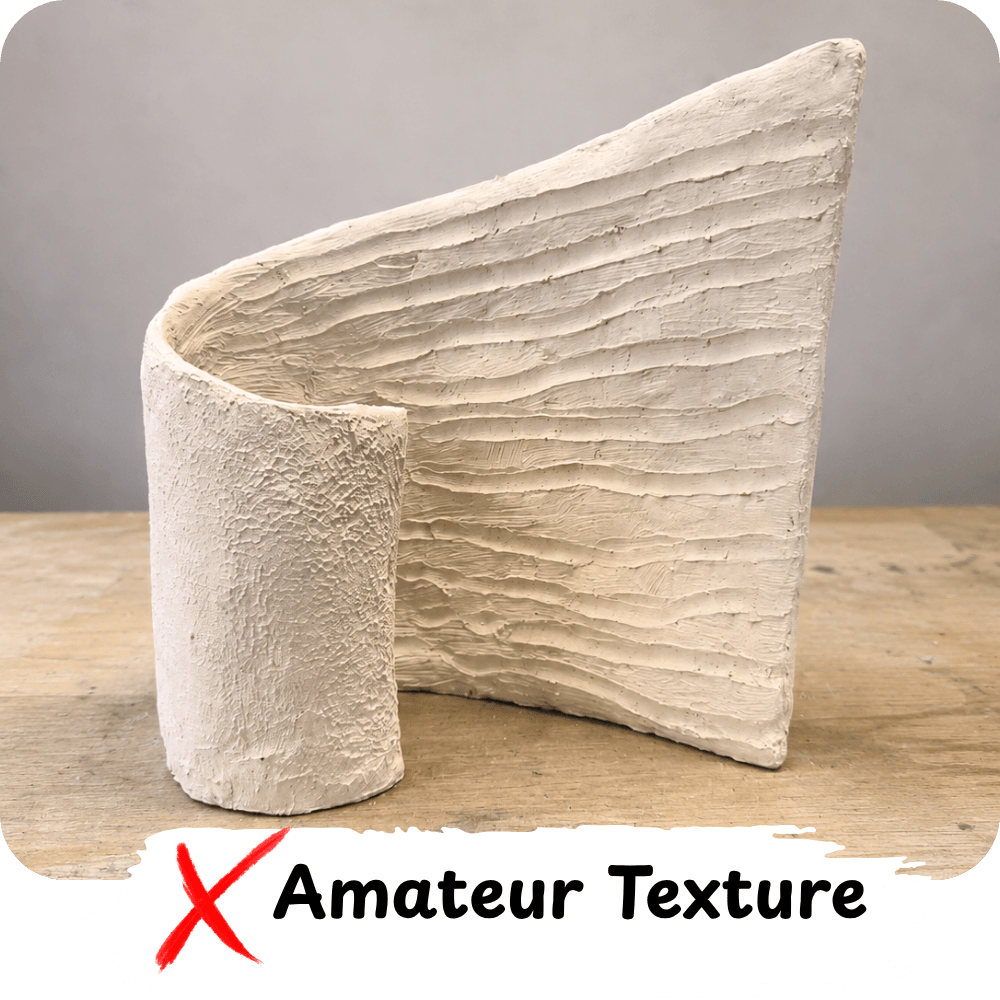
What if the texture looks wrong? The finished pieces you see online look so deliberate and refined. Is that years of experience, special tools, or just the right method?
What do I need for the light? It needs to be easy, simple and safe. And bring out that warm moody glow that changes the atmosphere.
What if it just looks like a mess?
I had every one of those questions. It was only through a lot of trial and error that I figured out a repeatable process that actually works — every time, without the guesswork.
This is what set me on the path of helping hopeful people like you, looking to make a beautiful planter, learn a new craft, and make something that looks unapproachable become totally doable.
Because the truth is, anyone can create this illuminated planter to transform your home with the right method…
In fact…
You can easily do it at home with tools you probably already own!
It's so simple that the only materials you need are aluminum foil, paper towel, a bag of plaster powder, and some wood glue. That's the whole materials list.
I'll bet you already have the first two!
And the only "tools" you need are household basics like a flexible spatula, garbage bags, and measuring cups.
The best part?
The whole setup barely makes a mess. Cleanup takes minutes.
And once it's done and sitting on your shelf, lights down, your plant casting soft shadows against that warm amber glow — you'll wonder why you waited so long to try it.
I want to tell you more about what I’ve got in store for you, but first…
There’s literally nothing stopping you from making this for your home!
...let me introduce myself
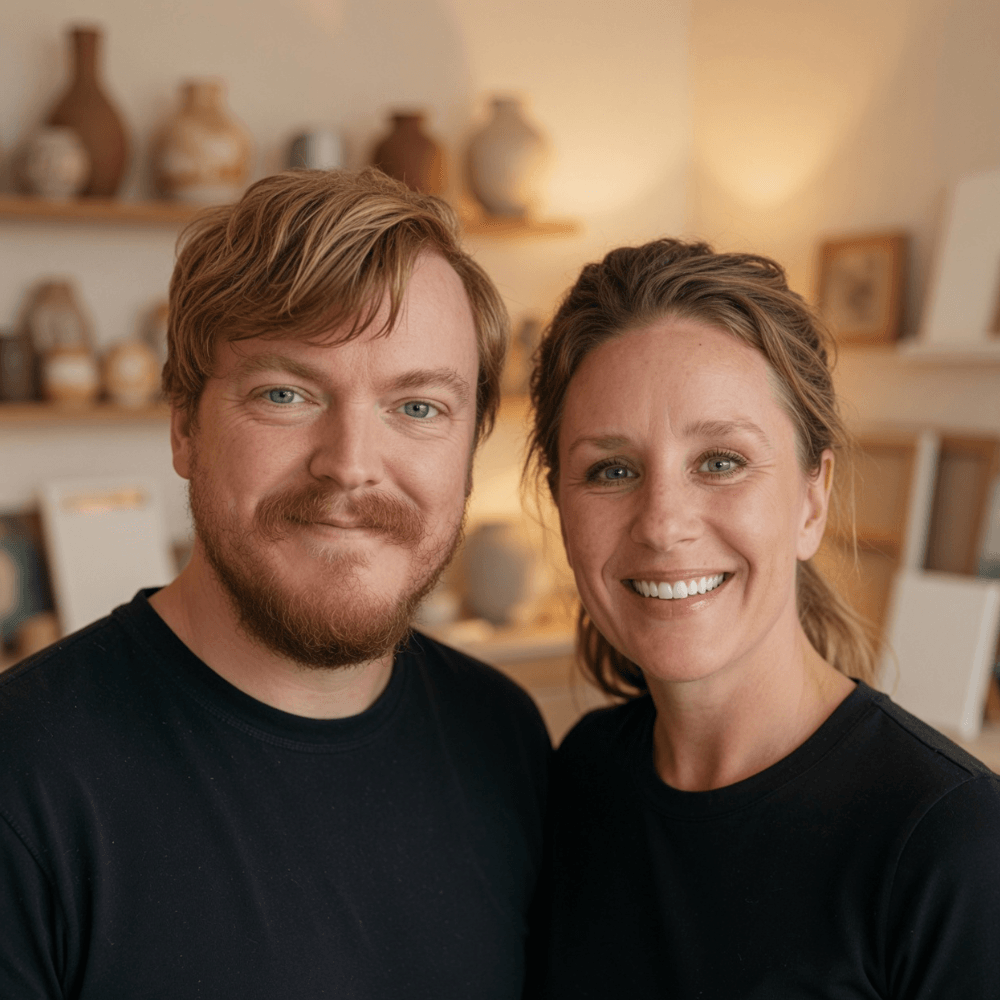
Thomas & Liz
Hey! I'm Thomas.
If you're anything like me and my wife Liz, you love the idea of a home that feels personal — filled with things that mean something, not just stuff that showed up in a box.
When we first came across some pictures of lighted planters, we were completely taken.
But I had no idea what they were made from or how to begin.
I figured out an extremely forgiving, beginner-friendly method through a lot of trial and error — and I learned that you really don't need any special skills or equipment to make something beautiful.
You just need the right materials, a simple process, and someone who has done it already to walk you through it.
That's exactly what this course is. I've taken everything I learned and turned it into a step-by-step system that works — even if you've never touched plaster before.
I just want you to enjoy making this as much as I did. Let's build something great together.

Introducing…
The Illuminated Planter
Video Workshop
*This workshop is pre-recorded: you can watch it at any time and go at your own pace.
Completely beginner-friendly. Fully self-paced. No experience required.

Here's what's inside the workshop...
Step 1:
Get Set Up & Ready To Go
Never made anything like this before? Perfect — this is where we start. By the end you'll have everything ready and a clear picture of exactly what you're about to build.

A walkthrough of the full build process from start to finish — so nothing surprises you and every step makes sense before you do it
The complete materials list: what to buy, where to get it, and what the whole project will cost (less than you think)
The workspace setup tips to make every stage easier — no studio required, just a table and a little space
Step 2:
Form The Hidden Structure
By the end of this step you'll have a solid, lightweight planter form that holds its shape — built from common household items, using a method that works every time.
How to create the foil core that gives your planter its form — flexible enough to shape by hand, rigid enough to hold once set
How many layers of paper towel to apply, and how to soak them so the glue bonds all the way through
The flat-to-upright technique: how to shape the planter on a flat surface and flip it into its final curve without it collapsing
How to know when the structure is fully dry and ready for the next stage
Step 3:
Build Up The Body
By the end of this step your planter has real substance — walls that feel solid, hold their shape, and are ready to texture.
The recipe for creating the perfect paste consistency
How to apply the paste so it sticks to vertical surfaces for easy shaping
The build-up sequence that creates even wall thickness all the way around — no thin spots, no heavy patches
How to tell when you've built up enough layers — and a final step to increase strength
Step 4:
Refine The Surface
By the end of this step your planter has a finished surface that looks architectural — the kind of texture that makes people think it came off a ceramics wheel.
How to apply the initial texture pass so it looks deliberate and consistent, even with beginner hands
The finishing pass that unifies the surface and removes the rough edges that give away a first attempt
Three surface mistakes that instantly downgrade the result — and the specific fix for each one
The edge treatment that gives the planter a clean, considered look people notice without knowing why

Step 5:
Add Your Light & Plant
By the end of this step your planter is fully assembled, safely plugged in, and glowing exactly the way it should.
How to choose the right bulb so the light works with your planter's form — warm, diffused, architectural
Why bulb position matters more than bulb brightness — and the placement that creates depth in the glow
Prepping and positioning your plant & the final assembly sequence so everything fits cleanly and the finished planter looks complete
The workshop price is:
$97
Why you'll be paying less for this course:
The full price for this workshop will be $97. That's what it'll cost once this launch is over and the page settles into its permanent home
But right now, this is a beta launch. We're limiting spots to make sure students actually finish, actually get results, and that the course delivers everything it promises. That feedback matters. And the tradeoff is a price that makes it an obvious yes.
If this works, and students are finishing their planters and sending in photos, the price goes up. If it doesn't land the way it should, the page comes down. Either way, this window is short.
So for now, you get everything for just $47.
ONE-TIME PURCHASE. LIFETIME ACCESS FOREVER.
No recurring charges. Ever.
You'll have the workshop forever. Go through it at your own pace, on your own time.

Normally $97
Currently Only $47
One-time payment. Lifetime access forever.

*If the next page doesn't load… I'm sorry, but the deal has ended!
Plus, For 30 Days You'll Be Backed By An Unconditional Money Back Refund
So you can try it completely risk-free:

You don't have to decide right now. Not fully, anyway.
Get access to the full course, start building, and see how it feels.
If it's not the right fit, if the material doesn't click for you, or if you're just not happy for any reason, just reply to your workshop access email within 30 days, and you'll get 100% of your money back within 24 hours.
No forms. No questions. No waiting around.
I built this course because I genuinely believe anyone can do this with the right guidance. If the course doesn't prove that to you, you shouldn't pay for it.
"You either love what you create... or you don't pay for it."
And there's more… my extra gifts for you!
Get 3 Bonuses When You Start Today
Bonus 1:
Sandy Surface Texture Guide ($17 Value)
The planter you see in the workshop has one signature texture — but you might prefer a different one.
This bonus shows you how to create a sandy surface finish — finer, more uniform, and with a warm natural feel that works beautifully in earthy or minimal interiors. Same materials, different technique.
The exact mix that creates a consistent sandy grain without looking gritty or rough
How to apply it evenly across curved surfaces so the texture looks intentional all the way around
The drying approach that locks in the texture without flattening it
How to finish and seal a sandy surface so it stays looking clean and refined
Bonus 2:
Dabbed Surface Texture Guide ($17 Value)
A second alternative finish — more organic and expressive. The dabbed technique creates an irregular, hand-worked surface that looks like it took years of practice.
The tool and motion that creates a consistent dab pattern without looking messy
How to control the depth of the texture so it reads as deliberate, not accidental
The areas where dabbing works best — and where to keep it smooth for contrast
How to finish and seal a dabbed surface so the texture stays sharp and defined
Bonus 3:
The No-Guessing Shopping List ($7 Value)
Every material used in the workshop, pre-searched and ready to order. No scrolling through dozens of similar products wondering which one is right — just a clean list of exactly what to buy, with direct links for many countries.

Every material from the workshop, linked directly to the right product on Amazon
Notes on what to look for if a product is out of stock — so you always get the right thing
Quantities to buy for a single planter so you don't over-order
The one or two upgrades worth spending a little more on — and where they actually make a difference
Begin today and you get:
Illuminated Planter Workshop
5 step-by-step video modules — from raw materials to finished planter
$97
Lifetime access + all future updates
Come back whenever you like. New additions included at no extra cost.
Included
100% risk-free money-back guarantee
30 days. No questions. No hoops.
Included
Bonus #1: The Sandy Texture
Step-by-step technique for a fine, natural-looking sandy finish
$17
Bonus #2: The Dabbed Texture
Step-by-step technique for a rich, textured dabbed finish
$17
Bonus #3: The No-Guess Shopping List
Exactly what to buy, where to find it, and what to skip
$7
Total Value
$148
Total Value: $148
Normally $97
Currently Only $47
One-time payment. Lifetime access forever.
*If the next page doesn't load… I'm sorry, but the deal has ended!
One More Thing...
Order in the next
and you'll also get:
Limited-Time Super Bonus
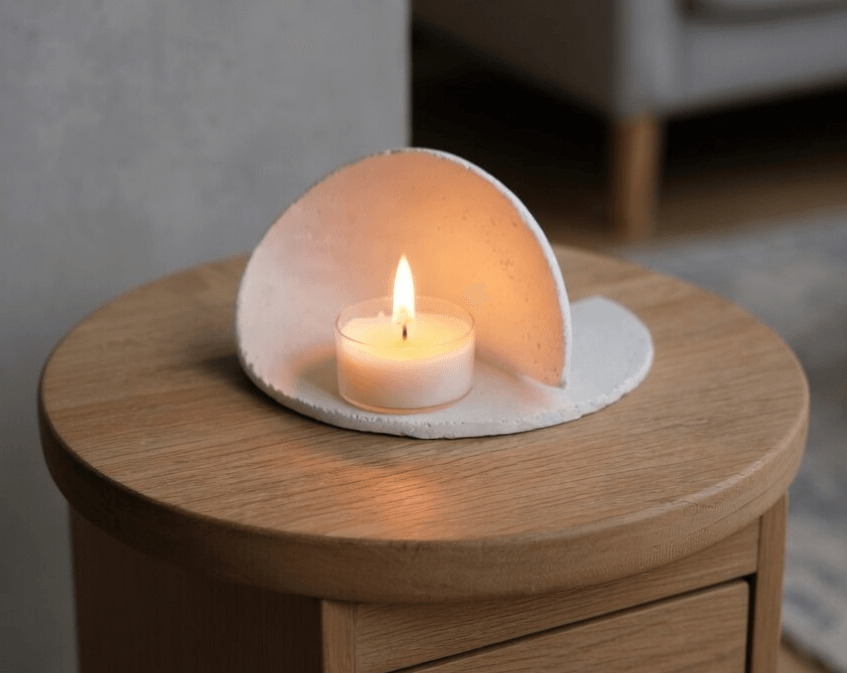
The Candle Cove: A Sculptural Tealight Surround
Once you've built your planter, you have everything you need to make this unique tealight surround. Same materials. Same method. A completely different form. Set a tealight inside and the warm glow does the rest.
Beautiful on a bedside table. Perfect as a gift. And the kind of thing that makes people ask — where'd you get that?
How to roll and shape the slab so the cone holds its form cleanly while it dries
The finishing approach that gives it the same architectural surface as your planter — smooth, matte, intentional
How to size it for a standard tealight so the proportions look right
This bonus offer expires in:
This bonus offer expires in:
FAQ
If you've read this far, you already know you want to make this. Let's go!
Here's Everything You're Getting Now For Just $47:
Illuminated Planter Workshop
5 step-by-step video modules — from raw materials to finished planter
$97
Lifetime access + all future updates
Come back whenever you like. New additions included at no extra cost.
Included
100% risk-free money-back guarantee
30 days. No questions. No hoops.
Included
Bonus #1: The Sandy Texture
Step-by-step technique for a fine, natural-looking sandy finish
$17
Bonus #2: The Dabbed Texture
Step-by-step technique for a rich, textured dabbed finish
$17
Bonus #3: The No-Guess Shopping List
Exactly what to buy, where to find it, and what to skip
$7
Limited-Time Super Bonus: The Candle Cove — A Sculptural Tealight Surround
Same materials, same method — a second beautiful project
$27
Total Value
$165
Total Value: $165
Normally $97
Currently Only $47
One-time payment. Lifetime access forever.
*If the next page doesn't load… I'm sorry, but the deal has ended!
© 2026 Frontier Enterprises, LLC
NOT FACEBOOK: This site is not a part of the Facebook website or Facebook Inc. Additionally, This site is NOT endorsed by Facebook in any way. FACEBOOK is a trademark of FACEBOOK, Inc.
All rights reserved